Showing posts with label Cisco/ASA. Show all posts

Monday, October 31, 2011

ASA 5510 IOS 8.x ASDM firewall dashboard IOS commands

As of 8.x, the ASDM has some excellent features to allow you to track down top talkers and get a better view into your traffic flows, but each of these features (especially the Top 10 Services) uses a good bit of RAM. If you are running a 5510 or smaller, that can cause you to run out of RAM. While the ASDM gives you the option to enable these features, you need to disable them via command line.

Use the 'no' keyword in front of the commands below to disable those functions:

Top 10 Access-Lists
======================================
enable
threat-detection statistics access-list
disable
no threat-detection statistics access-list

Top 10 Services (Very Memory Intensive - use only when troubleshooting)
======================================
enable
threat-detection statistics port
threat-detection statistics protocol
disable
threat-detection statistics port
threat-detection statistics protocol

Top 10 Sources / Top 10 Destinations (same command)
======================================
enable
threat-detection statistics host
disable
threat-detection statistics host

Friday, April 16, 2010

Recover ASA Software from ROMMON

Just putting these commands in a handy place since this seems to happen more often than I thought...
rommon #1> ADDRESS=192.168.1.10
rommon #2> SERVER=
192.168.1.1
rommon #3> GATEWAY=
192.168.1.1
rommon #4> IMAGE=
asa800-232-k8.bin
rommon #5> PORT=
Ethernet0/0
rommon #6>
tftp

ASA/PIX Order of Operations


====================
Packet Flow Sequence
====================
PIX/ASA - Inside (Higher Sec_Lev) to Outside (Lower SEC_Level)
---------------------------------------------------------------
Eg. Type - [Sub-Type] - Description
1. FLOW-LOOKUP - [] - Check for existing connections, if none found create a new connection.
2. ROUTE-LOOKUP - [input] - Initial Checking (Reverse Path Check, etc.)
3. ACCESS-LIST - [log] - ACL Lookup
4. CONN-SETTINGS - [] - class-map, policy-map, service-policy
5. IP-OPTIONS - [] -
6. NAT - [] - xlate
7. NAT - [host-limits] -
8. IP-OPTIONS - [] -
9. FLOW-CREATION - [] - If everything passes up until this point a connection is created.
10. ROUTE-LOOKUP - [output and adjacency] -

Wednesday, January 27, 2010

MSS Exceeded Workaround

After installing a new ASA 5520, I noticed that a few websites were loading very slowly or not at all. The problem seemed to be very intermittent, but reproducible by revisiting the websites at any time of the day. Browsing to the site from outside of the firewall showed the site to be responsive.

I started to watch the live log while browsing to the site and noticed packets being dropped. The log read:

Dropping TCP packet from outside: to inside: , reason: MSS exceeded, MSS 1260, data 1460

Apparently, this is a new security feature for the 7.0+ code for the ASA. Normally, the client and server send their MSS (Maximum Segment Size) while establishing the TCP connection. Once this occurs, neither the client or server should send a packet larger than their peer’s MSS. However, some HTTP servers do not recognize the MSS and send packets that are too large, and are thus dropped by the ASA.

The workaround for this is to allow the firewall to pass the packets whose data exceeds the MSS. Let’s say the server causing the problems ip is 192.168.10.9. First, create and access-list for any host accessing that server.

access-list MSS_Exceeded_ACL permit tcp any host 192.168.10.9

And then create a class map.

class-map MSS_Exceeded_MAP
match access-list MSS_Exceeded_ACL
exit
tcp-map mss-map
exceeded mss allow

Create the policy map.

policy-map MSS_Exceeded_MAP
class MSS_Exceeded_MAP
set connection advanced-options mss-map

Apply the map to the outside interface.

service-policy MSS_Exceeded_MAP interface outside

If there is more than one site, just add the additional sites to the MSS_Exceeded_ACL access list or change it to allow all sites.

access-list MSS_Exceeded_ACL permit tcp any any

For more information about MSS and logging these events, check out the document from Cisco.

CISCO ASA SSL CERT

GENERATE CSR

  1. From the Cisco Adaptive Security Device Manager (ASDM), select “Configuration” and then “Device Management.”
  2. Expand “Certificate Management,” then select “Identity Certificates,” and then “Add.”
  3. Select the button to “Add a new identity certificate” and click the “New…” link for the Key Pair.
  4. Select the option to “Enter new key pair name” and enter a name (any name) for the key pair. Next, click the “Generate Now” button to create your key pair.
  5. The key size should be changed to 2048 and Usage should be left on General purpose

  6. Next you will define the "“Certificate Subject DN” by clicking the Select button to the right of that field. In the Certificate Subject DN window, configure the following values by selecting each from the “Attribute” drop-down list, entering the appropriate value, and clicking “Add.”
    • CN – The name through which the firewall will be accessed (usually the full-qualified domain name, e.g., vpn.domain.com).
    • OU – The nameof your department within the organisation (frequently this entry will be listed as “IT”, “Web” Security or is simply left blank).
    • O – The legally registered name of your organisation/company.
    • C – Your country's two-digit code.
    • ST – The state in which your organisation is located.
    • L – The city in which your organisation is located.

  7. Next, click “Advanced” in the “Add Identity Certificate” window.
  8. In the FQDN field, type in the fully-qualified domain name through which the device will be accessed externally, e.g., vpn.domain.com (or the same name as was entered in the CN value in step 5).
  9. Click "OK" and then "Add Certificate." You will then be prompted to save your newly created CSR information as a text file (.txt extension).
  10. Remember the filename that you choose and the location to which you save it. You will need to open this file as a text file and copy the entire body of it (including the Begin and End Certificate Request tags) into the online order process when prompted.


Choose your SSL CA

Installing your SSL Certificate in the Adaptive Security Device Manager (ASDM)

  1. You will receive your SSL certificate and intermediate certificate by email. Copy each certificate from the email, paste each one into a separate text editor and save the files to a safe location with an extension of .crt, such as gs_sslcertificate.crt and gs_intermediate.crt.
  2. In ASDM select “Configuration” and then “Device Management.”
  3. Expand “Certificate Management” and select “CA Certificates” and then “Add.”
  4. With the option selected to “Install from a file”, browse to the gs_intermediate.crt file and then click the “Install Certificate” button at the bottom of the "Install Certificate" window.
  5. Your Intermediate certificate file is now installed. You will now need to install the gs_sslcertificate.crt file.

  6. In ASDM select “Configuration” and then “Device Management”.
  7. Expand “Certificate Management” and select “Identity Certificates”.
  8. Select the appropriate identity certificate from when your CSR was generated (the “Issued By” field should show as not available and the “Expiry Date” field will show Pending…). Click the Install button.
  9. Browse to the appropriate identity certificate (the gs_sslcertificate.crt provided by GlobalSign) and click “Install Certificate.”
  10. At this point you should receive confirmation that the certificate installation was successful.

Configuring WebVPN with ASDM to Use the New SSL Certificate

  1. In ASDM select “Configuration” and then “Device Management”.
  2. Click “Advanced” and then “SSL Settings”
  3. From "Certificates," choose the interface used to terminate WebVPN sessions, and then choose “Edit”.
  4. From the “Certificate” drop-down, select the newly installed certificate, then “OK”, and then “Apply”
  5. Configuring your certificate for use with the selected kind of WebVPN session is now complete.

SSL Certificate Installation from the Cisco ASA command line (alternate installation method)

  1. From the ciscoasa(config)# line, enter the following text:
  2. crypto ca authenticate my.globalsign.trustpoint

    Where my.globalsign.trustpoint is the name of trustpoint created when your certificate request was generated.

  3. Next, enter the entire body of the gs_intermediate.crt file followed by the word “quit” on a line by itself (the gs_intermediate.crt file can be opened and edited with a standard text editor, and the entire body of that file should be entered when prompted).
  4. When asked to accept the certificate, enter “yes”.
  5. When the certificate has been successfully imported, enter “exit”.
  6. Your Intermediate certificate file is now installed. You will now need to install the gs_sslcertificate.crt file.

  7. From the ciscoasa(config)# line, enter the following text:
  8. crypto ca import my.globalsign.trustpoint certificate

    Where my.globalsign.trustpoint is the name of trustpoint created when your certificate request was generated.

  9. Next, enter the entire body of the gs_sslcertificate.crt file followed by the word “quit” on a line by itself (the gs_sslcertificate.crt file can be opened and edited with a standard text editor, and the entire body of that file should be entered when prompted).
  10. You should then receive a message that the certificate was successfully imported.

Configuring WebVPN to Use the New SSL Certificate from the Cisco ASA command line

  1. From the ciscoasa(config)# line, enter the following text:

ssl trust-point my.globalsign.trustpoint outside

wr mem

Where my.globalsign.trustpoint is the name of trustpoint created when your certificate request was generated and "outside" is the name of the interface being configured.

Make sure to save the configuration.


Cisco ASA iPhone VPN Config

I recently purchased a shiny new iPhone 3G and wanted to be able to connect back to my house where I have a Cisco ASA 5505. I have noticed a lot of questions about how to get this to work, so here it is…

First, make sure you are running ASA Software version 8.0(3) or better. The previous versions have a bug when the iPhone connects that will boot all other users connected to the VPN.

On the ASA, we need to get the VPN configured. First, the ACLs for split-tunneling, no NAT and VPN access:

access-list RA_VPN_ACL extended permit ip any 172.30.30.0 255.255.255.0
access-list RA_VPN_SplitTunnel_ACL standard permit 172.25.25.0 255.255.255.0
access-list NoNAT_ACL extended permit ip 172.25.25.0 255.255.255.0 172.30.30.0 255.255.255.0
nat (inside) 0 access-list NoNAT_ACL

Since this config will authenticate to the local ASA, we need to have a username and password setup:

username iPhone password your_password

Now setup a DHCP pool for VPN clients:

ip local pool RA_VPN_POOL 172.30.30.100-172.30.30.200

Now create the crypto maps and apply them to the outside interface:

crypto ipsec transform-set RA_VPN_SET esp-aes esp-sha-hmac
crypto dynamic-map RA_VPN_MAP 1 match address RA_VPN_ACL
crypto dynamic-map RA_VPN_MAP 1 set transform-set RA_VPN_SET
crypto dynamic-map RA_VPN_MAP 1 set reverse-route
crypto map RA_VPN 65535 ipsec-isakmp dynamic RA_VPN_MAP
crypto map RA_VPN interface outside

Setup ISAKMP:

crypto isakmp enable outside
crypto isakmp policy 65535
authentication pre-share
encryption 3des
hash sha
group 2
lifetime 86400
crypto isakmp nat-traversal 20

Now create a remote access VPN policy. Make sure to add the split-dns value for your local domian. If you leave this out, the iPhone will not resolve DNS on the internal network!

group-policy RA_VPN_Policy internal
group-policy RA_VPN_Policy attributes
dns-server value DNS_Server_IP
vpn-tunnel-protocol IPSec
split-tunnel-policy tunnelspecified
split-tunnel-network-list value RA_VPN_SplitTunnel_ACL
split-dns value domain.local

Add the tunnel-group to allow the VPN connection:

tunnel-group RA_VPN type ipsec-ra
tunnel-group RA_VPN general-attributes
address-pool RA_VPN_POOL
default-group-policy RA_VPN_Policy
tunnel-group RA_VPN ipsec-attributes
pre-shared-key your_password

Now to configure the iPhone. First, go to Settings -> General -> Network -> VPN. Then Add VPN Configuration. Select IPSec at the top and enter your information. The Server is the IP address or hostname of the ASA. The Account is the Username you created in the config above. The Group Name is the tunnel-group name created on the ASA.


iPhone VPN Config

iPhone VPN Config

iPhone VPN Config

To connect the VPN, go to Settings -> VPN (this appears after you create a VPN connection). Just change the option to ON.

iPhone VPN Config

iPhone VPN Config


iPhone VPN Config

Once you see the VPN icon on the top bar, you are connected!

Thursday, January 7, 2010

Cisco ASA NetFlow Support – NetFlow Security Event Logging – NSEL

Cisco has changed its ways! Cisco ASA now supports NetFlow. The new feature in Cisco ASA version 8.2 is called NSEL (NetFlow Security Event Logging) and it allows all ASA models to support NetFlow. Below I have provided the NetFlow configuration of a Cisco ASA.

Three event types can trigger a NetFlow record.

flow-export destination inside x.x.x.x xxxx(Collector & Port)
access-list flow_export_acl permit ip host x.x.x.x host x.x.x.x

class-map flow_export_class
match access-list flow_export_acl

policy-map flow_export_policy
class flow_export_class
flow-export event-type flow-creation destination x.x.x.x(Collector IP)
service-policy flow_export_policy global

To see all event type records with NetFlow
event-type all
If you disable logging for flow export events this will increase performance
logging flow-export syslogs disable

  • Conf Configuration-Firewall->Service Policy Rules.
  • Click Add->select “Use class-default as the traffic class”->Next->Netflow (tab)->Add (check the collector(s) you want to use)->Finish->Apply.
NetFlow can be configured in the Cisco ASDM GUI by clicking:
* flow-create
* flow-denied
* flow-teardown
This isn’t your typical NetFlow

Monday, July 27, 2009

FWSM Upgarde

Step 1 Make the new software image available on a TFTP server, or make the MSFC a TFTP server by using this command:

msfc(config)# tftp-server bootflash:image name 

Step 2 If the MSFC is the TFTP server, make sure you have a VLAN interface on the MSFC reachable from the module. For example:

a. On the MSFC, enter these commands:

router(config)# interface Vlan30 
router(config)# description to_fwsm_vlan_30 
router(config)# ip address 10.20.30.2 255.255.255.0 
router(config)# no ip redirects 

b. On the module, enter these commands:

nameif vlan30 inside security100 
... 
ip address inside 10.20.30.5 255.255.255.0 

c. From the module make sure that you can ping the MSFC, by entering this command:

FWSM# ping 10.20.30.2 
10.20.30.2 response received -- 0ms 

Step 3 From the module enter the copy tftp flash command:

FWSM# copy tftp flash 
Address or name of remote host [127.0.0.1]? 10.20.30.2 
Source file name [cdisk]? c6svc-fwm-k9.1-1-0-207.bin 
copying tftp://10.20.30.2/c6svc-fwm-k9.1-1-0-207.bin to flash:image 
[yes|no|again]?yes 

!!!!!!!!!!!!!!!!!!!!!!!!!!!!!!!!!!!!!!!!!!!!!!!!!!!!!!!!!!!!!!!! 

The output shows the MSFC as the TFTP server.

Step 4 Reload the module by entering this command:

FWSM# reload

Wednesday, June 17, 2009

AnyConnect SSL VPN Client Configuration


In order to configure the ASA for VPN access using the AnyConnect client, complete these steps:

1. Configure a Self-Issued Certificate.

2. Upload and Identify the SSL VPN Client Image.

3. Enable Anyconnect Access.

4. Create a new Group Policy.

5. Configure Access List Bypass for VPN Connections.

6. Create a Connection Profile and Tunnel Group for the AnyConnect Client Connections.

7. Configure NAT Exemption for AnyConnect Clients.

8. Add Users to the Local Database.

Step 1. Configure a Self-Issued Certificate

By default, the security appliance has a self-signed certificate that is regenerated every time the device is rebooted. You can purchase your own certificate from vendors, such as Verisign or EnTrust, or you can configure the ASA to issue an identity certificate to itself. This certificate remains the same even when the device is rebooted. Complete this step in order to generate a self-issued certificate that persists when the device is rebooted.

ASDM Procedure

1. Click Configuration, and then click Remote Access VPN.

2. Expand Certificate Management, and then choose Identity Certificates.

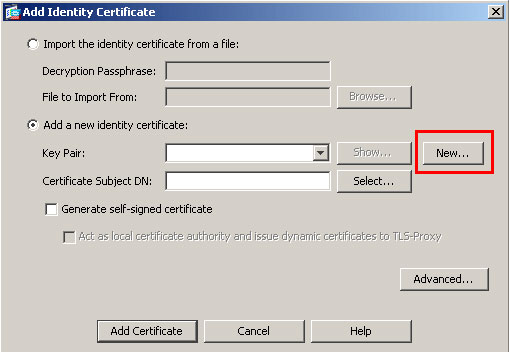
3. Click Add, and then click the Add a new identity certificate radio button.
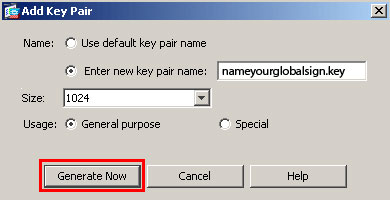
4. Click New.

5. In the Add Key Pair dialog box, click the Enter new key pair name radio button.

6. Enter a name to identify the keypair.

This example uses sslvpnkeypair.

7. Click Generate Now.

8. In the Add Identity Certificate dialog box, ensure the newly created key pair is selected.

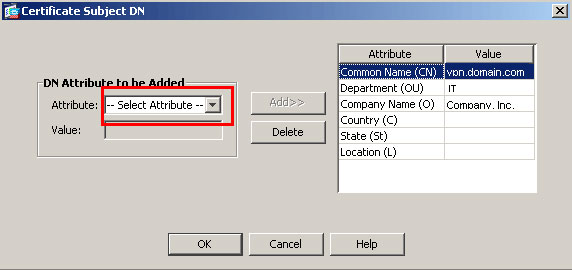
9. For Certificate Subject DN, enter the fully qualified domain name (FQDN) that will be used to connect to the VPN terminating interface.

CN=sslvpn.cisco.com

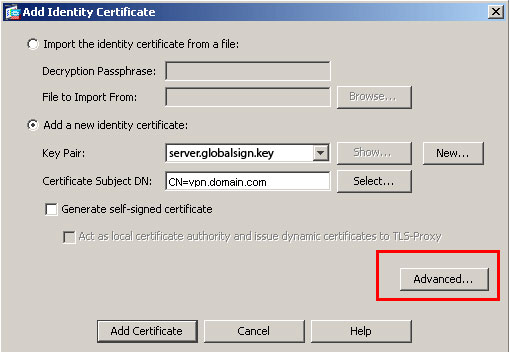
10. Click Advanced, and enter the FQDN used for the Certificate Subject DN field.

For example, FQDN: sslvpn.cisco.com

11. Click OK.

12. Check the Generate Self Signed Certificate check box, and click Add Certificate.

13. Click OK.

14. Click Configuration, and then click Remote Access VPN.

15. Expand Advanced, and choose SSL Settings.

16. In the Certificates area, choose the interface that will be used to terminate the SSL VPN (outside), and click Edit.

17. In the Certificate drop-down list, choose the self-signed certificate that you generated earlier.

18. Click OK, and then click Apply.

Command Line Example

ciscoasa

ciscoasa(config)#crypto key generate rsa label sslvpnkeypair
INFO: The name for the keys will be: sslvpnkeypair
Keypair generation process begin. Please wait...
 !--- Generate an RSA key for the certificate. (The name should be unique. 
!--- For example, sslvpnkeypair.)
 ciscoasa(config)#crypto ca trustpoint localtrust
 !--- Create a trustpoint for the self-issued certificate.
ciscoasa(config-ca-trustpoint)#enrollment self
ciscoasa(config-ca-trustpoint)#fqdn sslvpn.cisco.com
ciscoasa(config-ca-trustpoint)#subject-name CN=sslvpn.cisco.com
!--- The fully qualified domain name is used for both fqdn and CN.
!--- The name should resolve to the ASA outside interface IP address.
ciscoasa(config-ca-trustpoint)#keypair sslvpnkeypair
!--- The RSA key is assigned to the trustpoint for certificate creation. 
ciscoasa(config-ca-trustpoint)#crypto ca enroll localtrust noconfirm
% The fully-qualified domain name in the certificate will be: sslvpn.cisco.com
ciscoasa(config)# ssl trust-point localtrust outside
!--- Assign the trustpoint to be used for SSL connections on the outside interface.

Step 2. Upload and Identify the SSL VPN Client Image

ASDM Procedure

1. Click Configuration, and then click Remote Access VPN.

2. Expand Network (Client) Access, and then expand Advanced.

3. Expand SSL VPN, and choose Client Settings.

4. In the SSL VPN Client Images area, click Add, and then click Upload.

5. Browse to the location where you downloaded the AnyConnect client.

6. Select the file, and click Upload File.

Once the client uploads, you receive a message that states the file was uploaded to flash successully.

7. Click OK.

A dialog box appears to confirm that you want to use the newly uploaded image as the current SSL VPN client image.

8. Click OK.

9. Click OK, and then click Apply.

10. Repeat the steps in this section for each operating system-specific Anyconnect package that you want to use.

Command Line Example

ciscoasa

ciscoasa(config)#copy tftp://192.168.50.5/anyconnect-win-2.0.0343-k9.pkg flash
 Address or name of remote host [192.168.50.5]?
 Source filename [anyconnect-win-2.0.0343-k9.pkg]?
 Destination filename [anyconnect-win-2.0.0343-k9.pkg]?
 Accessing tftp://192.168.50.5/anyconnect-win-2.0.0343-k9.pkg...!!!!!!!!!!!!!
Writing file disk0:/anyconnect-win-2.0.0343-k9.pkg...
!!!!!!!!!!!!!!!!!!!!!!!!!!!!!!!!!!!!!!!!!!!!!!!!!!!!!!!!!!!!!!!!!!!!!!!!!!!!!
2635734 bytes copied in 4.480 secs (658933 bytes/sec)
!--- AnyConnect image is downloaded to ASA via TFTP.
ciscoasa(config)#webvpn
ciscoasa(config-webvpn)#svc image disk0:/anyconnect-win-2.0.0343-k9.pkg 1
!--- Specify the AnyConnect image to be downloaded by users. The image that is 
!--- downloaded the most should have the lowest number. This image uses 1 for the
!--- AnyConnect Windows image.

Step 3. Enable Anyconnect Access

ASDM Procedure

1. Click Configuration, and then click Remote Access VPN.

2. Expand Network (Client) Access, and then choose SSL VPN Connection Profiles.

3. Check the Enable Cisco AnyConnect VPN Client check box.

4. Check the Allow Access check box for the outside interface, and click Apply.

Command Line Example

ciscoasa

ciscoasa(config)#webvpn
ciscoasa(config-webvpn)#enable outside
ciscoasa(config-webvpn)#svc enable
 !--- Enable AnyConnect to be downloaded to remote computers.

Step 4. Create a new Group Policy

A group policy specifies the configuration parameters that should be applied to clients when they connect. This example creates a group policy named SSLClientPolicy.

ASDM Procedure

1. Click Configuration, and then click Remote Access VPN.

2. Expand Network (Client) Access, and choose Group Policies.

3. Click Add.

4. Choose General, and enter SSLClientPolicy in the Name field.

5. Uncheck the Address Pools Inherit check box.

6. Click Select, and then click Add.

The Add IP Pool dialog box appears.

7. Configure the address pool from an IP range that is not currently in use on your network.

This example uses these values:

o Name: SSLClientPool

o Starting IP Address: 192.168.25.1

o Ending IP Address: 192.168.25.50

o Subnet Mask: 255.255.255.0

8. Click OK.

9. Choose the newly created pool, and click Assign.

10. Click OK, and then click More Options.

11. Uncheck the Tunneling Protocols Inherit check box.

12. Check SSL VPN Client.

13. In the left pane, choose Servers.

14. Uncheck the DNS Servers Inherit check box, and enter the IP address of the internal DNS server that the AnyConnect clients will use.

This example uses 192.168.50.5.

15. Click More Options.

16. Uncheck the Default Domain Inherit check box.

17. Enter the domain used by your internal network. For example, tsweb.local .

18. Click OK, and then click Apply.

Command Line Example

ciscoasa

ciscoasa(config)#ip local pool SSLClientPool 192.168.25.1-192.168.25.50 mask 255.255.255.0
 !--- Define the IP pool. The IP pool should be a range of IP addresses 
!--- not already in use on the internal network. 
ciscoasa(config)#group-policy SSLCLientPolicy internal
ciscoasa(config)#group-policy SSLCLientPolicy attributes
ciscoasa(config-group-policy)#dns-server value 192.168.50.5
!--- Specify the internal DNS server to be used.
ciscoasa(config-group-policy)#vpn-tunnel-protocol svc
!--- Specify VPN tunnel protocol to be used by the Group Policy.
ciscoasa(config-group-policy)#default-domain value tsweb.local
!--- Define the default domain assigned to VPN users.
ciscoasa(config-group-policy)#address-pools value SSLClientPool
!--- Assign the IP pool created to the SSLClientPolicy group policy.

Step 5: Configure Access List Bypass for VPN Connections

When you enable this option, you allow the SSL/IPsec clients to bypass the interface access list.

ASDM Procedure

1. Click Configuration, and then click Remote Access VPN.

2. Expand Network (Client) Access, and then expand Advanced.

3. Expand SSL VPN, and choose Bypass Interface Access List.

4. Ensure the Enable inbound SSL VPN and IPSEC Sessions to bypass interface access lists check box is checked, and click Apply.

Command Line Example

ciscoasa

ciscoasa(config)#sysopt connection permit-vpn
 !--- Enable interface access-list bypass for VPN connections. 
!--- This example uses the vpn-filter command for access control.
 ciscoasa(config-group-policy)#

Step 6. Create a Connection Profile and Tunnel Group for the AnyConnect Client Connections

When VPN clients connect to the ASA, they connect to a connection profile or tunnel group. The tunnel group is used to define connection parameters for specific types of VPN connections, such as IPsec L2L, IPsec remote access, clientless SSL, and client SSL.

ASDM Procedure

1. Click Configuration, and then click Remote Access VPN.

2. Expand Network (Client) Access, and then expand SSL VPN.

3. Choose Connection Profiles, and click Add.

4. Choose Basic, and enter these values:

o Name: SSLClientProfile

o Authentication: LOCAL

o Default Group Policy: SSLClientPolicy

5. Ensure the SSL VPN Client Protocol check box is checked.

6. In the left pane, expand Advanced, and choose SSL VPN.

7. Under Connection Aliases, click Add, and enter a name to which users can associate their VPN connections. For example, SSLVPNClient.

8. Click OK, and then click OK again.

9. At the bottom of the ASDM window, check the Allow user to select connection, identified by alias in the table above at login page check box, and click Apply.

Command Line Example

ciscoasa

ciscoasa(config)#tunnel-group SSLClientProfile type remote-access
 !--- Define tunnel group to be used for VPN remote access connections.
 ciscoasa(config)#tunnel-group SSLClientProfile general-attributes
ciscoasa(config-tunnel-general)#default-group-policy SSLCLientPolicy
ciscoasa(config-tunnel-general)#tunnel-group SSLClientProfile webvpn-attributes
ciscoasa(config-tunnel-webvpn)#group-alias SSLVPNClient enable
 !--- Assign alias for tunnel group.
ciscoasa(config-tunnel-webvpn)#webvpn
ciscoasa(config-webvpn)#tunnel-group-list enable
!--- Enable alias/tunnel group selection for SSL VPN connections.

Step 7. Configure NAT Exemption for AnyConnect Clients

NAT exemption should be configured for any IP addresses or ranges you want to allow the SSL VPN clients to access. In this example, the SSL VPN clients need access to the internal IP 192.168.50.5 only.

Note: If NAT-control is not enabled, this step is not required. Use the show run nat-control command to verify. In order to verify through ASDM, click Configuration, click Firewall, and choose Nat Rules. If the Enable traffic through the firewall without address translation check box is checked, you can skip this step.

ASDM Procedure

1. Click Configuration, and then click Firewall.

2. Choose Nat Rules, and click Add.

3. Choose Add NAT Exempt Rule, and enter these values:

o Action: Exempt

o Interface: inside

o Source: 192.168.50.5

o Destination: 192.168.25.0/24

o NAT Exempt Direction: NAT Exempt outbound traffic from interface 'inside' to lower security interfaces (Default)

4. Click OK, and then click Apply.

Command Line Example

ciscoasa

ciscoasa(config)#access-list no_nat extended permit 
 ip host 192.168.50.5 192.168.25.0 255.255.255.0
!--- Define access list to be used for NAT exemption. 
ciscoasa(config)#nat (inside) 0 access-list no_nat
!--- Allow external connections to untranslated internal 
!--- addresses defined by access lisy no_nat.
ciscoasa(config)#

If you use local authentication (the default), you must define user names and passwords in the local database for user authentication.

ASDM Procedure

1. Click Configuration, and then click Remote Access VPN.

2. Expand AAA Setup, and choose Local Users.

3. Click Add, and enter these values:

o Username: matthewp

o Password: p@ssw0rd

o Confirm Password: p@ssw0rd

4. Select the No ASDM, SSH, Telnet or Console Access radio button.

5. Click OK, and then click Apply.

6. Repeat this step for additional users, and then click Save.

Command Line Example

ciscoasa

ciscoasa(config)#username matthewp password p@ssw0rd
ciscoasa(config)#username matthewp attributes
ciscoasa(config-username)#service-type remote-access
!--- Assign user remote access only. No SSH, Telnet, ASDM access allowed.
ciscoasa(config-username)#write memory
!--- Save the configuration.

Verify

Use this section in order to verify that the SSL VPN configuration is successful

Connect to the ASA with the AnyConnect Client

Install the client directly on a PC, and connect to the ASA outside interface, or enter https and the FQDN/IP address of the ASA in a web browser. If you use a web browser, the client installs itself upon successful login.

Verify SSL VPN Client Connections

Use the show vpn-sessiondb svc command in order to verify connected SSL VPN clients.

ciscoasa(config-group-policy)#show vpn-sessiondb svc
Session Type: SVC
Username     : matthewp               Index        : 6
Assigned IP  : 192.168.25.1           Public IP    : 172.18.12.111
Protocol     : Clientless SSL-Tunnel DTLS-Tunnel
Encryption   : RC4 AES128             Hashing      : SHA1
Bytes Tx     : 35466                  Bytes Rx     : 27543
Group Policy : SSLClientPolicy        Tunnel Group : SSLClientProfile
Login Time   : 20:06:59 UTC Tue Oct 16 2007
Duration     : 0h:00m:12s
NAC Result   : Unknown
VLAN Mapping : N/A                    VLAN         : none
ciscoasa(config-group-policy)#

The vpn-sessiondb logoff name username command logs off users by user name. An Administrator Reset message is sent to the user when disconnected.

ciscoasa(config)#vpn-sessiondb logoff name matthewp
Do you want to logoff the VPN session(s)? [confirm]
INFO: Number of sessions with name "matthewp" logged off : 1