GENERATE CSR
- From the Cisco Adaptive Security Device Manager (ASDM), select “Configuration” and then “Device Management.”
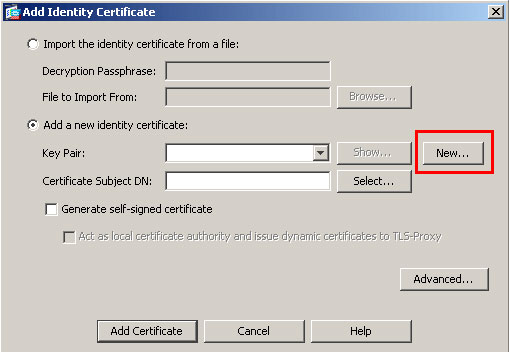
- Expand “Certificate Management,” then select “Identity Certificates,” and then “Add.”
- Select the button to “Add a new identity certificate” and click the “New…” link for the Key Pair.
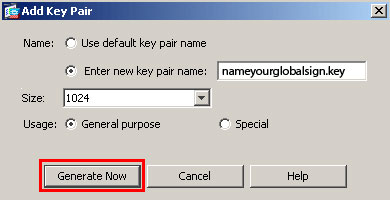
- Select the option to “Enter new key pair name” and enter a name (any name) for the key pair. Next, click the “Generate Now” button to create your key pair.
The key size should be changed to 2048 and Usage should be left on General purpose
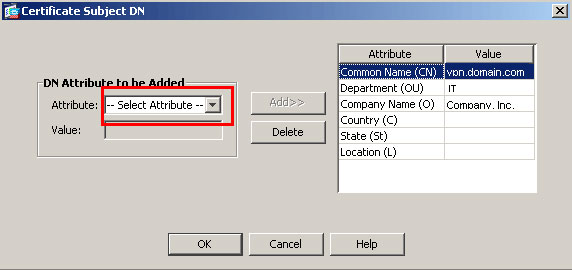
- Next you will define the "“Certificate Subject DN” by clicking the Select button to the right of that field. In the Certificate Subject DN window, configure the following values by selecting each from the “Attribute” drop-down list, entering the appropriate value, and clicking “Add.”
- CN – The name through which the firewall will be accessed (usually the full-qualified domain name, e.g., vpn.domain.com).
- OU – The nameof your department within the organisation (frequently this entry will be listed as “IT”, “Web” Security or is simply left blank).
- O – The legally registered name of your organisation/company.
- C – Your country's two-digit code.
- ST – The state in which your organisation is located.
- L – The city in which your organisation is located.
- Next, click “Advanced” in the “Add Identity Certificate” window.
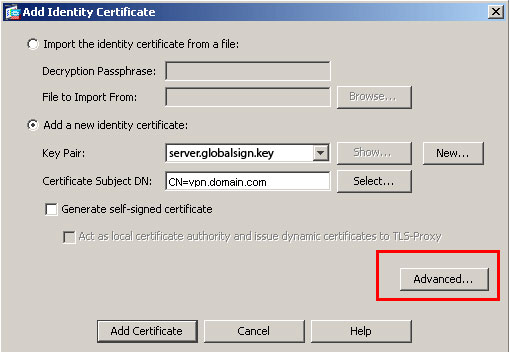
- In the FQDN field, type in the fully-qualified domain name through which the device will be accessed externally, e.g., vpn.domain.com (or the same name as was entered in the CN value in step 5).
- Click "OK" and then "Add Certificate." You will then be prompted to save your newly created CSR information as a text file (.txt extension).
Remember the filename that you choose and the location to which you save it. You will need to open this file as a text file and copy the entire body of it (including the Begin and End Certificate Request tags) into the online order process when prompted.
Choose your SSL CA
Installing your SSL Certificate in the Adaptive Security Device Manager (ASDM)
- You will receive your SSL certificate and intermediate certificate by email. Copy each certificate from the email, paste each one into a separate text editor and save the files to a safe location with an extension of .crt, such as gs_sslcertificate.crt and gs_intermediate.crt.
- In ASDM select “Configuration” and then “Device Management.”
- Expand “Certificate Management” and select “CA Certificates” and then “Add.”
- With the option selected to “Install from a file”, browse to the gs_intermediate.crt file and then click the “Install Certificate” button at the bottom of the "Install Certificate" window.
Your Intermediate certificate file is now installed. You will now need to install the gs_sslcertificate.crt file.
- In ASDM select “Configuration” and then “Device Management”.
- Expand “Certificate Management” and select “Identity Certificates”.
- Select the appropriate identity certificate from when your CSR was generated (the “Issued By” field should show as not available and the “Expiry Date” field will show Pending…). Click the Install button.
- Browse to the appropriate identity certificate (the gs_sslcertificate.crt provided by GlobalSign) and click “Install Certificate.”
At this point you should receive confirmation that the certificate installation was successful.
Configuring WebVPN with ASDM to Use the New SSL Certificate
- In ASDM select “Configuration” and then “Device Management”.
- Click “Advanced” and then “SSL Settings”
- From "Certificates," choose the interface used to terminate WebVPN sessions, and then choose “Edit”.
- From the “Certificate” drop-down, select the newly installed certificate, then “OK”, and then “Apply”
Configuring your certificate for use with the selected kind of WebVPN session is now complete.
SSL Certificate Installation from the Cisco ASA command line (alternate installation method)
- From the ciscoasa(config)# line, enter the following text:
crypto ca authenticate my.globalsign.trustpoint
Where my.globalsign.trustpoint is the name of trustpoint created when your certificate request was generated.
- Next, enter the entire body of the gs_intermediate.crt file followed by the word “quit” on a line by itself (the gs_intermediate.crt file can be opened and edited with a standard text editor, and the entire body of that file should be entered when prompted).
- When asked to accept the certificate, enter “yes”.
- When the certificate has been successfully imported, enter “exit”.
Your Intermediate certificate file is now installed. You will now need to install the gs_sslcertificate.crt file.
- From the ciscoasa(config)# line, enter the following text:
crypto ca import my.globalsign.trustpoint certificate
Where my.globalsign.trustpoint is the name of trustpoint created when your certificate request was generated.
- Next, enter the entire body of the gs_sslcertificate.crt file followed by the word “quit” on a line by itself (the gs_sslcertificate.crt file can be opened and edited with a standard text editor, and the entire body of that file should be entered when prompted).
You should then receive a message that the certificate was successfully imported.
Configuring WebVPN to Use the New SSL Certificate from the Cisco ASA command line
- From the ciscoasa(config)# line, enter the following text:
ssl trust-point my.globalsign.trustpoint outside
wr mem
Where my.globalsign.trustpoint is the name of trustpoint created when your certificate request was generated and "outside" is the name of the interface being configured.
Make sure to save the configuration.
The key size should be changed to 2048 and Usage should be left on General purpose
- CN – The name through which the firewall will be accessed (usually the full-qualified domain name, e.g., vpn.domain.com).
- OU – The nameof your department within the organisation (frequently this entry will be listed as “IT”, “Web” Security or is simply left blank).
- O – The legally registered name of your organisation/company.
- C – Your country's two-digit code.
- ST – The state in which your organisation is located.
- L – The city in which your organisation is located.
Remember the filename that you choose and the location to which you save it. You will need to open this file as a text file and copy the entire body of it (including the Begin and End Certificate Request tags) into the online order process when prompted.
- You will receive your SSL certificate and intermediate certificate by email. Copy each certificate from the email, paste each one into a separate text editor and save the files to a safe location with an extension of .crt, such as gs_sslcertificate.crt and gs_intermediate.crt.
- In ASDM select “Configuration” and then “Device Management.”
- Expand “Certificate Management” and select “CA Certificates” and then “Add.”
- With the option selected to “Install from a file”, browse to the gs_intermediate.crt file and then click the “Install Certificate” button at the bottom of the "Install Certificate" window.
- In ASDM select “Configuration” and then “Device Management”.
- Expand “Certificate Management” and select “Identity Certificates”.
- Select the appropriate identity certificate from when your CSR was generated (the “Issued By” field should show as not available and the “Expiry Date” field will show Pending…). Click the Install button.
- Browse to the appropriate identity certificate (the gs_sslcertificate.crt provided by GlobalSign) and click “Install Certificate.”
Your Intermediate certificate file is now installed. You will now need to install the gs_sslcertificate.crt file.
At this point you should receive confirmation that the certificate installation was successful.
Configuring WebVPN with ASDM to Use the New SSL Certificate
- In ASDM select “Configuration” and then “Device Management”.
- Click “Advanced” and then “SSL Settings”
- From "Certificates," choose the interface used to terminate WebVPN sessions, and then choose “Edit”.
- From the “Certificate” drop-down, select the newly installed certificate, then “OK”, and then “Apply”
Configuring your certificate for use with the selected kind of WebVPN session is now complete.
SSL Certificate Installation from the Cisco ASA command line (alternate installation method)
- From the ciscoasa(config)# line, enter the following text:
- Next, enter the entire body of the gs_intermediate.crt file followed by the word “quit” on a line by itself (the gs_intermediate.crt file can be opened and edited with a standard text editor, and the entire body of that file should be entered when prompted).
- When asked to accept the certificate, enter “yes”.
- When the certificate has been successfully imported, enter “exit”.
- From the ciscoasa(config)# line, enter the following text:
- Next, enter the entire body of the gs_sslcertificate.crt file followed by the word “quit” on a line by itself (the gs_sslcertificate.crt file can be opened and edited with a standard text editor, and the entire body of that file should be entered when prompted).
crypto ca authenticate my.globalsign.trustpoint
Where my.globalsign.trustpoint is the name of trustpoint created when your certificate request was generated.
Your Intermediate certificate file is now installed. You will now need to install the gs_sslcertificate.crt file.
crypto ca import my.globalsign.trustpoint certificate
Where my.globalsign.trustpoint is the name of trustpoint created when your certificate request was generated.
You should then receive a message that the certificate was successfully imported.
Configuring WebVPN to Use the New SSL Certificate from the Cisco ASA command line
- From the ciscoasa(config)# line, enter the following text:
ssl trust-point my.globalsign.trustpoint outside
wr mem
Where my.globalsign.trustpoint is the name of trustpoint created when your certificate request was generated and "outside" is the name of the interface being configured.
Make sure to save the configuration.
No comments:
Post a Comment