Creating the service account
Before you create the database on the SQL server, create a domain account for the vCenter service. This service does not need to be a member of any group aside from the Domain Users group.
Log onto the new vCenter Windows Server 2008 R2 64-bit server and open up Server Manager.
Navigate to Configuration –> Local Users and Groups –> Groups and open up the Administrators group. Add the service account to the local administrators group.
Creating the SQL Database on Microsoft SQL Server
Open up SQL Server Management Studio.
Once SQL Server Management Studio launches, connect to the SQL instance.
Once in SQL Server Management Studio, start a new query with the New Query button at the top left hand corner.
This will bring up a new query window.
use [master]
go
CREATE DATABASE [VCDB] ON PRIMARY
(NAME = N'vcdb', FILENAME = N'C:\VCDB.mdf', SIZE = 2000KB, FILEGROWTH = 10% )
LOG ON
(NAME = N'vcdb_log', FILENAME = N'C:\VCDB.ldf', SIZE = 1000KB, FILEGROWTH = 10%)
COLLATE SQL_Latin1_General_CP1_CI_AS
go
use VCDB
go
sp_addlogin @loginame=[vpxuser], @passwd=N'vpxuser!0', @defdb='VCDB',
@deflanguage='us_english'
go
ALTER LOGIN [vpxuser] WITH CHECK_POLICY = OFF
go
CREATE USER [vpxuser] for LOGIN [vpxuser]
go
sp_addrolemember @rolename = 'db_owner', @membername = 'vpxuser'
go
use MSDB
go
CREATE USER [vpxuser] for LOGIN [vpxuser]
go
sp_addrolemember @rolename = 'db_owner', @membername = 'vpxuser'
go
I never end up using this script because it essentially creates a new SQL authentication account for vCenter to use. What I prefer doing is to add the vCenter domain service account to the permissions instead of creating a completely new one. The following is a modified script that I use instead.
Please note that the parameters that will need to be changed accordingly to your infrastructure are Enlarged and BOLDED.
use [master]
go
CREATE DATABASE [VCDB] ON PRIMARY
(NAME = N'vcdb', FILENAME = N'D:\databases\VCDB.mdf', SIZE = 2000KB, FILEGROWTH = 10% )
LOG ON
(NAME = N'vcdb_log', FILENAME = N'D:\databases\VCDB.ldf', SIZE = 1000KB, FILEGROWTH = 10%)
COLLATE SQL_Latin1_General_CP1_CI_AS
go
use VCDB
go
sp_grantlogin @loginame=[domain\svc_vCenter]
go
sp_defaultdb @loginame=[domain\svc_vCenter], @defdb='VCDB'
go
ALTER LOGIN [domain\svc_vCenter] WITH DEFAULT_LANGUAGE = us_english;
go
CREATE USER [domain\svc_vCenter] for LOGIN [domain\svc_vCenter]
go
sp_addrolemember @rolename = 'db_owner', @membername = 'domain\svc_vCenter'
go
use MSDB
go
CREATE USER [domain\svc_vCenter] for LOGIN [domain\svc_vCenter]
go
sp_addrolemember @rolename = 'db_owner', @membername = 'domain\svc_vCenter'
go
Parameters:
D:\databases\VCDB.mdf' = The location of the database and the database filename.
D:\databases\VCDB.ldf' = The location of the log and the log filename.
domain\svc_vCenter = The vCenter service account name preceded by the domain NetBIOS name.
------------------------------------------------------------------------------------------------------------------------------------------------------------------
For those who are interested, the line:
ALTER LOGIN [vpxuser] WITH CHECK_POLICY = OFF
… was taken out because this line disables the password policy check and only applies to a SQL Authentication account.
The code essentially does the following:
- Create a database named VCDB.
- Add the domain service account we created to the SQL server.
- Set the default database for the service account.
- Set the default language for the service account.
- Give service account db_owner permissions to VCDB.
- Give service account db_owner permissions to msdb.
Once you’ve made the appropriate changes execute the code and if no syntax mistakes were made, you will see the message:
Command(s) completed successfully.
The new database has now been created and the vCenter service account now has the proper permissions.
Creating the 64-bit ODBC DSN Connection
Update: If you find that you’re missing the SQL Server Native Client 10.0 option, please see this link below.
Microsoft SQL Server 2008 Feature Pack, August 2008--
http://www.microsoft.com/downloads/en/details.aspx?FamilyId=C6C3E9EF-BA29-4A43-8D69-A2BED18FE73C&displaylang=en
--Microsoft SQL Server 2008 Feature Pack, October 2008--
http://www.microsoft.com/downloads/en/details.aspx?FamilyId=228DE03F-3B5A-428A-923F-58A033D316E1&displaylang=en
--Microsoft® SQL Server® 2008 R2 Feature Pack--
http://www.microsoft.com/downloads/en/details.aspx?FamilyID=ceb4346f-657f-4d28-83f5-aae0c5c83d52
Open up the Start menu and navigate to Administrative Tools –> Data Sources (ODBC).
Navigate to the System DSN tab and click Add.
Make sure you click on the System DSN tab before you create the DSN!
A common mistake I’ve come across when troubleshooting DSN creation problems is that a SQL Server driver was created instead of the SQL Server Native Client 10.0. So make sure you select the latter and click Finish.
SQL Server = WRONG
SQL Server Native Client 10.0 = RIGHT
Fill in the following fields:
Name: This is just a logical name and can be anything you want.
Description: Logical description.
Server: You can either put the NetBIOS or FQDN of the server name. I personally prefer the FQDN.
Since we’re using a domain service account, we can leave the following parameters as default.
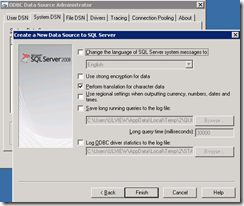
Make sure you change the default database to your vCenter database that you created earlier. The name in the installation guide is VCDB.
Leave the following settings as default and click Finish.
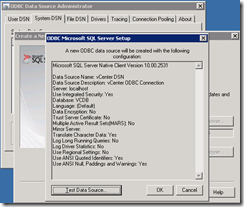
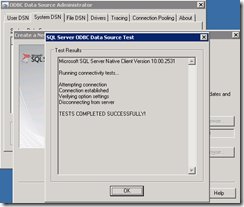
A window is now presented that allows you to test the ODBC connection. You might wonder what credentials it’s using to test the connection and the answer to that is what you’re currently logged in as. This DSN is set up to automatically use whichever process that attempts to run it and since the process that will be using this DSN is ran under the domain service account we created, those credentials would be passed.
To test the service account’s permissions, make sure you’re logged into Windows with that account.
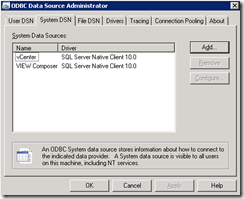
Once you click finish, you will now see your new ODBC DSN.
Hope this helps clarify the process. Remember this is for vSphere 4.1 and not 4.0 as the latter uses a 32-bit ODBC DSN.
While the installation for VMware vCenter 4.1 isn’t a whole lot different than vCenter 4.0 or even Virtual Center 2.5, I figure I’ll write a post describing the process since I documented one of my installs.
Some key items that we should be aware about are:
- Note that 4.0 uses a 32-bit ODBC driver while 4.1 uses 64-bit

- If you’re using a full version of SQL, we need to create the database first
- Log in with the service account you want the vCenter services to be ran as.
Launch the installation and ensure that you right-click and choose Run as administrator.
 Read the EULA.
 Agree to the EULA.
 Type in the information for the required fields.
 If you created the ODBC connection correctly, you’ll be able to see it in the list.
 I was a bit annoyed to see that I had to log in as the service account in order to set the services to run as the service account. As shown in the screenshot below, I had logged in with my own account did not have an option to change it.
 Select the directory you want the binaries to be installed into or leave it set to the default.
 Choose standalone or linked mode.
 Change the ports if required.
 Select the proper settings for your environment.
 Kick off the install.
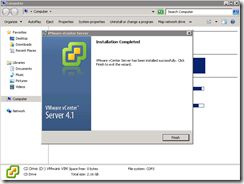
 The install will proceed from this point on.


